Do you know you can edit your photos on Mac without photoshop? Yes, Mac has free editing apps that will enable you to resize, adjust, crop, rotate, apply filters, and enhance your photos in your desired way. In this article, we will look at how you can use these apps to edit photos without Photoshop.
Edit Photos using the Photos App
- First, launch the Photos app.
- Open your Mac library and find the image that you want to edit.
- Press Command-Return or double-click on the photo that you want to edit
- In the toolbar, click Edit, and you will see three tabs (Adjust, Crop, and Filters) above the image. Click on these tabs to unveil further editing options.
Now let us look at how you can use each of the three tabs.
Cropping photos with the Photos App
The cropping feature will enable you to remove parts of photos, adjust the photo ratio, or improve the photo’s composition.
If you want to crop a photo:
- Launch the Photos app
- Find the photo you want to crop and double-click it
- Click edit and in the toolbar in the top of photos, Click crop to unveil more aspects
- You will see a menu on the right-hand side that will help you choose the aspect ratio.
- Another alternative is to crop the photo automatically. You can do it by clicking Auto in your screen’s bottom right-hand corner.
- Once you crop the photo to how you desire it to be, click done.
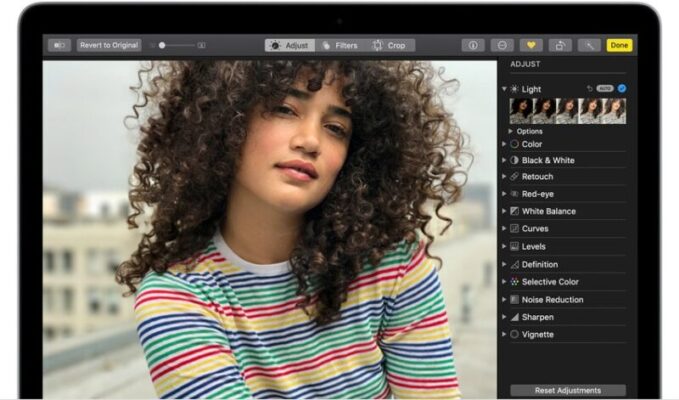
Adjusting photo with Photos App
This feature in the Photos app will enable you to adjust features in your photos. For example, you can adjust light, color, sharpness, white balance, and Redeye, etc. You can have a look at this guide for some useful recommendations on how you can use these features. If you are not content with how an adjust feature changes your photo, at the top left corner of your editing window, click Revert to Original to restore your image into the original state.
If you want to adjust your photo:
- Launch the photo app
- Open the photo you want to adjust and double click it
- Click edit in the toolbar, then click adjust.
- A range of ways on adjustment feature will pop up on the right-hand menu.
- Make the necessary change and click Done when you are happy with your photo.
How to filter a photo with Photos App
Photos App has nine filters that you can use to improve the look on your photos
If you want to filter a photo:
- First, launch the Photos app
- Find the photo you want to filter and double click on it
- Click on Edit and the toolbar at the top open Filters
- Choose the filter you want to apply and click Done
Editing with Preview
Preview is a tool in Mac that can also help you make quick changes and adjustments to your photos before sending them. The app can enable you to crop, resize, rotate and adjust a photo
How can you resize an image with Preview?
- Open the Preview app, click tools in the Apple menu, and click on adjust the size.
- A window where you can adjust a photo will open.
- Make your adjustment, then click okay.
Rotating a Photo on Preview.
- In the top toolbar of the preview app, there is a rotate button.
- Click on it until your photo gets to your desired position.
- Once you are done, click on the Apple menu, then file and Save your photo.
Cropping an image on Preview
If you want to crop an image,
- Open it with Preview, then click and drag the cursor to the photo area you wish to crop
- At the right-hand corner, click the crop button.
- Once done, click File and save this image.
Adjusting color on Preview
- Open your photo in Preview
- In the Apple menu, click tool then go to Adjust color
- From the range of sliders that appear, choose the adjustment feature you want to apply to your photo.
Wrap up
As you have noted, you don’t need to invest in photoshop to edit photos on Mac unless you are looking for professional-grade features. Take advantage of the simple apps we have covered to help you edit your photos on Mac at no cost!

Read Dive is a leading technology blog focusing on different domains like Blockchain, AI, Chatbot, Fintech, Health Tech, Software Development and Testing. For guest blogging, please feel free to contact at readdive@gmail.com.